
To make an OC (original character), start with one idea you care about, then decide five things: a name, a want, a flaw, a shape and a palette. Draft the look with an AI character tool or a quick sketch, keep the version that feels right, and lock it in a turnaround sheet that shows the character from every side. That sheet, plus a short written profile, is what keeps your OC the same in every drawing, comic panel or video you make later.
This guide walks you through how to make an OC in seven steps, with prompts that work, a real test from our own studio and the honest limits of AI drafts.
What makes a good OC
A good OC is easy to recognize and easy to write. Recognizable means a clear shape, a small palette and one signature detail. Easy to write means the character wants something and has a flaw that gets in the way. Most forgettable OCs fail on the second half: they look great on a sheet but nobody knows what they would do in a scene.
Keep this short checklist next to you:
- One core idea in a sentence: "a ghost who runs a night bakery".
- A want and a flaw. She wants to be remembered. She cannot touch anything warm.
- A silhouette you could spot in solid black.
- A palette of two or three colors plus one accent.
- One signature item: a charm, a scar, a scarf, a lantern.
How to make an OC in 7 steps
Step 1: Start from one idea, not a look
Write one sentence that mixes two things that do not usually go together. A shy knight. A retired dragon who runs a laundromat. A cheerful necromancer who hates the dark. The contrast gives you story for free, and it will guide every visual choice after this.
Then add three personality words, for example "stubborn, warm, nosy". If you get stuck, the character backstory generator can draft a past that fits your sentence, including the small habits and quirks that make a character feel real.
Step 2: Give your OC a name and a want
Say the name out loud a few times. Short names are easier to remember and easier to type in prompts. Check it is not already a famous character.
Now write what the character wants and what stops them. "Mika wants to win the city art prize, but she freezes when anyone watches her work." That one line is your first plot.
Step 3: Design the silhouette
Before colors and faces, think in shapes. Round shapes read as friendly, tall thin shapes as elegant or strange, wide blocky shapes as strong. Add one big feature that breaks the outline: a hat, horns, a tail, a cape, a weapon on the back.
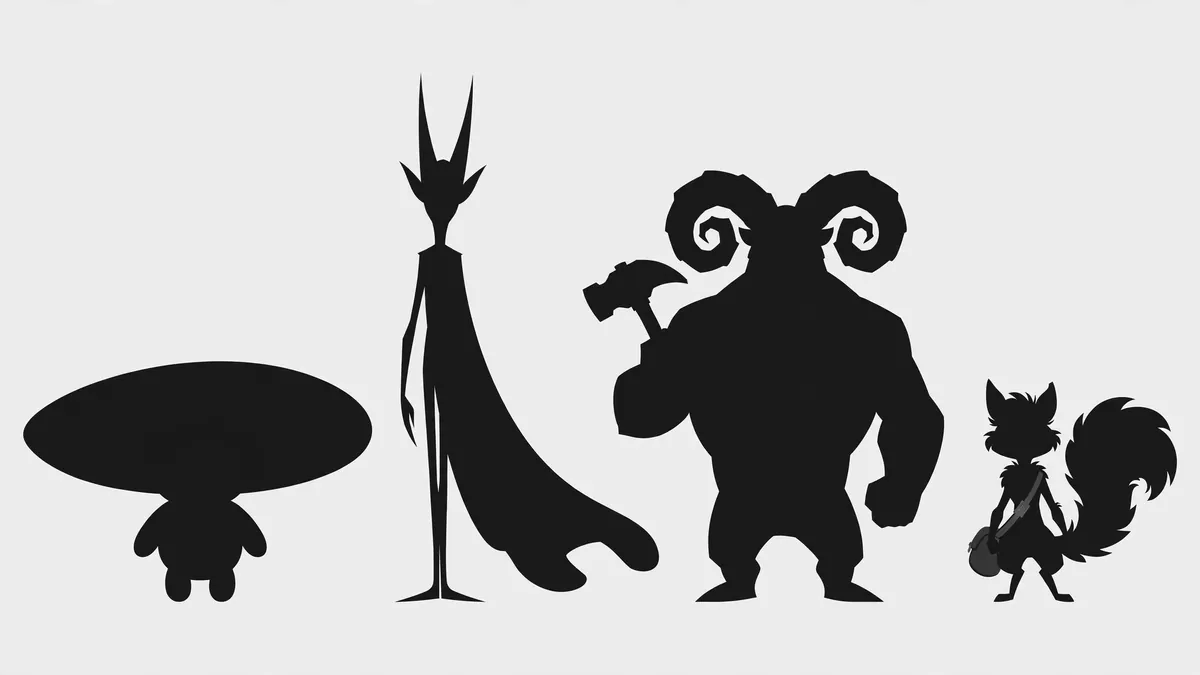
A quick test: fill your design in solid black. If you can still tell it apart from your other characters, the shape works.
Step 4: Pick a palette and one signature detail
Choose two or three main colors and one accent that appears in a small place, like a ribbon, eyes or a charm. Warm reds and golds feel bold. Cool blues feel calm. Pastels feel soft and young. Keep the accent rare so it stays special.
Write the palette down in words ("teal hair, yellow raincoat, dark green pants, red sneakers") because you will paste this line into every prompt.
Step 5: Draft the look with AI
Open the OC Maker and pick a species, body type, outfit, palette, personality and art style (anime, chibi, furry, fantasy or cartoon). Or type your own description. A prompt that works follows this order:
who they are, body, hair and face, outfit, signature item, palette, mood, art style
For example: "a young woman with short teal hair and calm brown eyes, yellow raincoat over a white hoodie, dark green cargo pants, red sneakers, a small fox charm on a crossbody bag, gentle and curious, anime style".
Make three to five drafts and change one thing at a time. If you change everything at once you cannot tell what made the good version good. Each draft costs 30 credits, shown before you press Generate.
Making a character for a world you already love? Use a fandom version such as the fursona maker, and see our fursona guide for species, markings and ref sheets.
Step 6: Build a turnaround sheet
A turnaround sheet shows your OC from the front, three-quarter, side and back in the same pose and size. Artists use it as the master copy, and it is the single most useful file you will make.
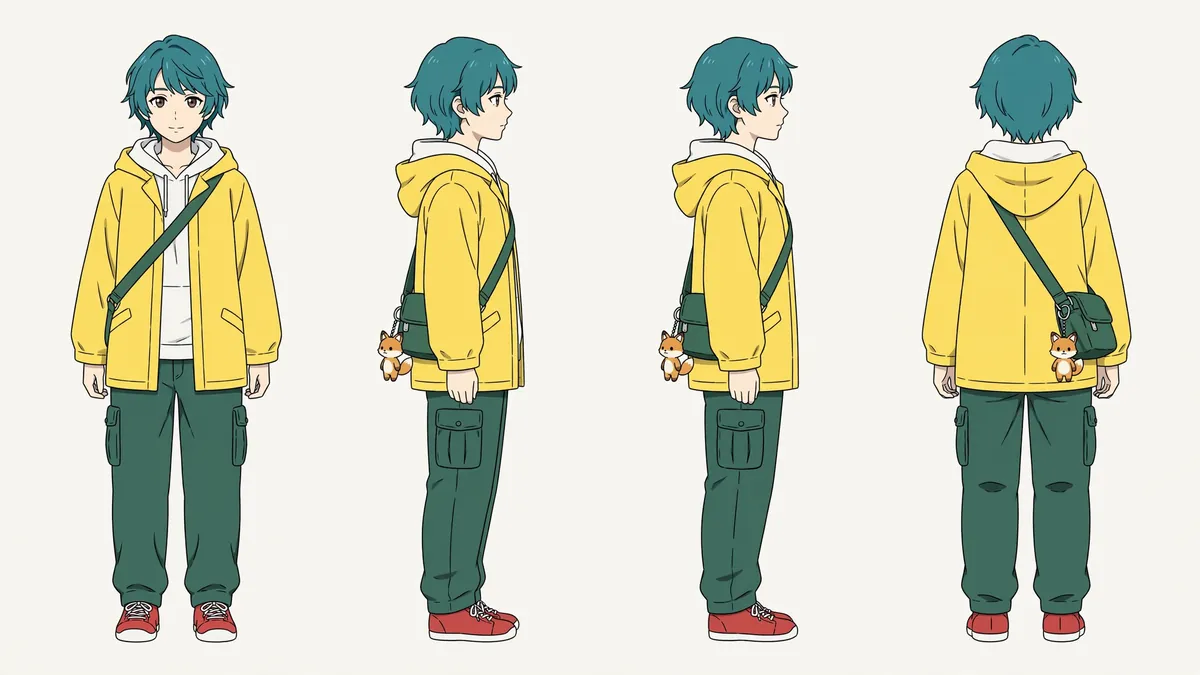
Ask for "a character turnaround sheet, front, three-quarter, side and back views, same neutral pose, plain background", then paste your full description. Add color swatches and short notes (height, eye color, what the charm is) in any image editor.
Step 7: Write a one-page profile
Put the name, age range, core idea, want, flaw, three personality words, palette, signature item and three habits on one page. Add two or three lines of backstory, no more. Long lore can come later. This page is what you, a friend or an artist will check every time the character shows up somewhere new.
How we tested
We judge OC tools by one job: can the character appear in many scenes and still be the same person? So we ran this guide's own steps and looked at the results frame by frame.
For the turnaround above we used one prompt with the full description. It held the palette, the cargo pockets, the red sneakers and the fox charm across all four views. It also showed the most common AI mistake: two of the four views came out as side views, and the "three-quarter" view never appeared. The fix is simple. Generate the views you are missing on their own, then keep the best sheet as your master. Always check a sheet view by view before you rely on it.
The bigger test came from a film made in Ziztu Studio. Hana, the swordswoman from our short film The Last One, started as a four-view character sheet. With that sheet attached, she was placed in five new shots: rain, a rooftop at sunset, a ramen stall, a neon alley and a battle stance.
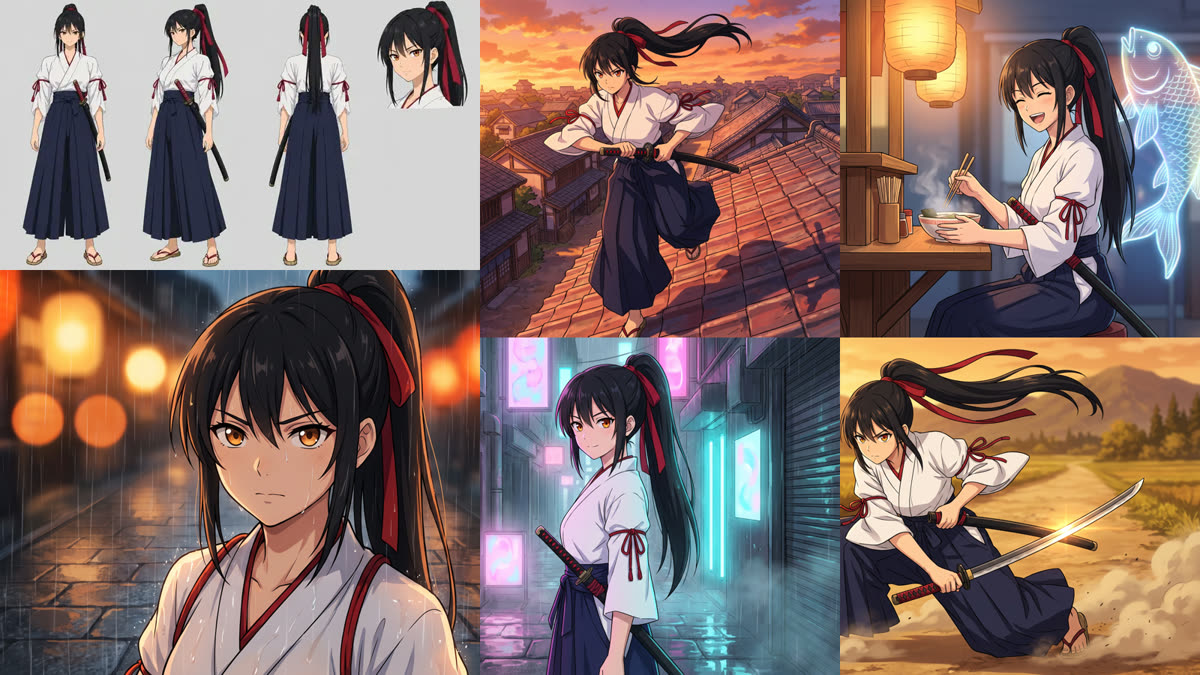
The red hair ribbon, the white top and the navy hakama stay the same in every shot. That is the payoff of steps 4 and 6: a small palette and a clean sheet are what the model can follow.
Keep your OC consistent
Consistency is where most people get stuck after the first good picture. What works:
- One master description. Same words, same order, every time.
- Reference images. Attach the turnaround sheet when you make a new scene. Models follow a picture better than a paragraph.
- One model per project. Switching models mid-story changes faces and line style.
- Check every image against the sheet before you keep it.
In the AI Video Studio the character sheet goes with every shot of a project, so your OC can carry a whole episode, not just one portrait. If you want to take your character further, our guide on how to make anime with AI covers scripts, shots and voices.
Honest limits
- AI drafts drift. Small details like earrings, patterns and logos on clothes change between images. Keep signature items big and simple.
- Hands and props can come out wrong. Regenerate rather than fix by hand if you cannot draw.
- Turnarounds repeat views, as in our test. Check each one.
- Cost adds up if you regenerate a lot. Each OC Maker image is 30 credits. A detailed final sheet with GPT Image 2.5 at high quality is 150 credits, so draft cheap and finish once.
- Some communities do not accept AI art. Many art sites and OC communities have their own rules on AI images. Read them before you post, and label AI images where a platform asks, as TikTok does for AI-generated content.
- Copyright is about people. The US Copyright Office says copyright protects human authorship. Your writing, story and edits around the character are the parts that are clearly yours.
Bring your OC to life
I started Ziztu after my own attempts to direct high-quality anime and micro dramas with other AI tools kept falling short. The lesson that stuck: a character is only worth something if it stays the same from shot to shot. Lock the look first, then tell the story.
Ready to make yours? Open the OC Maker, write your one-sentence idea, and generate your first draft. Each image is 30 credits, and plans start at $39 a month.